Saturday, July 1, 2017

My Top 10 Tips for a Happy, Successful Handmade Business.


1. USE ALL YOUR PHOTOS AND KEYWORDS ON ETSY. You need to give the buyer all the info they need about your items and photos are the best way to do that.  If you don't use all the keywords, and use them well, you're negating the little bit of search traffic you get that leads to great, new customers. And for the love, USE GOOD IMAGES.  Take a class at a local college or camera store.  I've done it and its SO worth it.  You'll save editing time, look professional, and give customers a clear idea of what's coming in the mail. 
2. HAVE CUSTOMER FRIENDLY POLICIES.  When I see a shop state, "no refunds, no excuses, " I don't shop there.  Or another favorite, "I'm not responsible for items lost in the mail."  Well, the LAW says you are.  Pay for insurance on your shipments, or don't spend the sale money until the item is received just in case.  Be the kind of shopkeeper you like to shop with. 
3. BROWSE AND LEARN.  Cruise Etsy for an hour or two.  When you find a shop you love, make a list of why you love it.  Of course, don't copy them, but you can sure incorporate your own twist on some things.  Do they have a conversational tone in the product description? Do their images really pop?  Is there a theme to their listings?  Do they not carry too big of a variety of items? These are things you can do too.  
4. ADVERTISE.  Most successful shops don't just post their items on Etsy or another site and then they magically sell.  If you want somewhat steady sales, consider your site your showcase.  You still have to get people to look at it.  Use a variety of social media channels to connect with customers and watch your analytics to see which are most effective so you can focus more time there. Oh, and DON'T LOSE YOURSELF IN YOUR ADS.  You know that page on Facebook you unliked for clogging your newsfeed with every listing they have, posted in a single day?  Yeah.  Yuck.  The instagram account that made it impossible to see your cute nephew with all the posts?  You unfollowed.  Don't spam.  Offer some personal connection to your audience.  Shopping with a real person is the charm of handmade.  
5. NO WHINING.  You can complain to your hubby all you want about your sales being down.  Go to lunch with your bestie and talk through a problem you have with a customer. Don't go public with your complaining.  It makes customers not want to shop with you.  They'll think you're difficult to deal with or, if sales are slow, that there's some good reason not to shop with you. 
6. PAY YOURSELF.  I'm often asked why I make yarn that costs so much.  Well, it costs that much to make!  Factor in top quality supplies, my time, my equipment, fees, listing and photography time, advertising time, and you're really getting a pretty good deal.  Remember, its easy to lower prices if you need to.  Its pretty hard to keep your customers and raise them.  No one pays you more than you ask.  Price your items appropriately. 
7. KEEP SPECIALS SPECIAL.  You know that shop you follow?  The one that ALWAYS has big, blow out, 40% off or more sales?  Do you ever buy anything from them at full price?  No.  Do you rush to purchase when its sale time?  No, there will be another in a week or two.  Their product is only worth the sale price to you.  Same goes for your shop. If your prices are fair, be rather firm about them.  Don't devalue yourself or your items. Sales are fun and fine, but don't need to be constant. 
8. SET UP A SEPARATE BANKING ACCOUNT FOR YOUR BUSINESS.  This service typically doesn't cost you a thing and makes tax time a lot easier for you!  It also helps you identify funds available.  You can use the money for personal expenses (note it for tax time) but you won't be accidentally spending your grocery money on buttons.  (Please say I'm not the only person with a major button buying problem!)
9. KEEP FUNDS AVAILABLE IN YOUR ACCOUNT FOR SUPPLIES.  How much do your supplies for a custom order typically cost?  How much to replenish your shipping supplies or business cards?  Keep those amounts in your account so if things are slow for a little while, you can push through. No need to close up shop because no one shopped for a few weeks. 

10. BE PATIENT.  Hey, Rome wasn't built in a day and your item wasn't made in a minute!  I've been selling on Etsy for about 8 years, as The Fine Lime for 6, and it wasn't until about 2 years ago that I had much of anything to do in the summers.  The first 4 years, I could have just put my spinning wheel away for summer.  But consistently practicing my craft and making connections with customers has paid off!  
Remember, be professional, be kind, and don't copy other sellers. Get feedback from your honest-rather-than-nice friends and family.  Improve your shop a little every day.  Keep learning about your craft.  Love what you do and who you do it for.  

Tuesday, November 3, 2015

6 Simple Ways to Grow Your Handmade Business Now!


The HOLIDAYS are coming, and for many of you, its the busiest season!  Try these simple ideas you can implement right away to improve your sales.

  1.  Be your billboard 
    Wear the scarf you made, have your kids wear their cute beanies, just use your product the way your customer would.  You may be surprised how many potential customers you'll gain when people see your products in action.  Be sure to have business cards in your bag.  
  2. Gift
    This makes others happy and makes them billboards too.  So your shop was slow in December?  Grandma needs a gift?  She likes that purple cowl?  Everyone wins.  
  3. Donate
    When you donate an item from your shop to a charitable event, its tax deductible.  You can choose the event that works for you.  For example, my yarn may not be in demand locally, but I'm from a very artsy town in Washington State, so I donate to a youth organization's charity auction there.  I get exposure and they make some moola for a great cause.  
  4. Barter
    Everyone seems to run short on cash at some point in the Holiday season, with gifts still to acquire!  Help your pocketbook AND your shop by bartering.  Swapping with another shop owner will get your product in the hands of a potential customer and helps BOTH of your businesses gain exposure.  I often swap for handmade gifts and promotional items for my yarn orders.  
  5. Let others see 
    No one enjoys the constant stream of MLM posts from Facebook "friends", but people do like to hear about your real hobbies, interests, and day to day life.  Is your son trying on all the girly hats you're shipping out?  Post a pic.  Is your mailman drowning in pretty new materials for your shop?  Post a pic!  That stuff isn't annoying or sales pitchy.  
  6. Make new friends
    I know, you're so busy, but a little stress relief is good!  Go out with the mommy group.  Get involved with the knitting club.  Make time for the support group.  Your profession is a big part of your life and others like to hear about what you do.  You don't need to invite anyone to make a purchase.  I never do.  That is me time, not shop time.  Someone may ask for a business card or tell a friend about your work.  I've had a few support group moms buy my yarn because they genuinely like it and that feels nice.  


Monday, June 22, 2015

Etsyversary No. 4


The Fine Lime turns FOUR on Friday!  I'd like to announce the FOUR fabulous ways we will be celebrating this year!

1.  An Etsyversary coupon code, valid now through Wed. July 1st, is THEFOURTH and will save you $4 on any order!
2.  GIVEAWAYS on four social media platforms!  One winner in each place.  Be sure to follow thefinelime on Instagram, @thefinelime on Twitter, The Fine Lime Yarn Co. on Google+, and The Fine Lime on Facebook!
3.  A PENNY AUCTION on my facebook page on June 26th.
4.  An Etsyversary coupon code on June 26th ONLY - FOURLIMES.

** all coupon codes will be valid in my Etsy shop, Etsy Preview Album, and SUPERDUPERDEALS album (which will make for some crazy great prices!)

I'm hoping to have a dye day photo this week to celebrate as well.  I hope you enjoy all the fun and best of luck to you in the giveaways!  

Thursday, February 19, 2015

Originality and Trends

Of course, we all try to be original and unique, but lets face it, when something is on trend, we really want to jump on it!  Whether its a color, a stitch, a texture, or a product, our customers ask for it and it seems stupid to say no.  Here are some tips for staying current without feeling like a copycat.
  1. When a customer sends you a photo or link and wants one JUST LIKE IT, do the honorable thing and send them back to the source.
    Its what you'd want another seller to do for you!  If the source says they're too busy or no longer making that item, you can do it as a custom job, but try to convince your customer to give you a little creative freedom. 
    Make sure you've researched the going price for the handmade item requested.  If your customer is just fishing for a better price, quote them the fair going price.  Remember, if YOU don't pay yourself fairly NO ONE WILL. The customer may come back for more, but you'll resent working for pennies.  
  2. Put your own spin on the trend!  
    I'll use something currently on trend for my customers as an example - the handspun prop layer.  Ways to make it your own include; using only Fine Lime yarn (heh, I like that one. Let's all do that!  LOL!), using a different stitch than everyone else, having your spinner add something special to your thick and thin yarn like curls, lace, ribbon, a thread ply, coils, stripes, etc, specializing in a color palette (pastels, neutrals, bold, a color with grey, hand dyed, factory dyed, etc), trying a new shape like ROUND, adding a wicked cool border, trying a bulky yarn instead of TnT, or making an economy option by making the center of the layer in a millspun yarn and just using mini skeins for the border.   
  3. Stay ahead of the game.  
    See if you can take the current idea and imagine what would come next!  What would be something logical to accompany the current trend or give YOUR customer something unique?  If you had the hot item, what would you want to go with it?  What would you want to improve your set up/collection?  
  4. Get your inspiration from trends outside of the yarn world.  
    Some places I like to look are runway fashion, furniture catalogs, popular baby accessories, sports, nature, stationary, and vintage books/magazines.  
  5. Create a variety of items.  
    So, your cool cat butt prop layer didn't sell.  No big deal, you're trying a lot of different ideas.  Something is bound to catch on!  My Signature Thick and Thin merino is my best selling yarn, but that doesn't mean that I don't keep spinning singles and trying out new art yarns and new fibers.  Sometimes they catch on like my CURLS line, sometimes they don't like the coarser wools.  
  6. Resist the urge to do EXACTLY what is working for someone else.  
    Here's the deal.  When you just do what someone else does, you don't actually do as well as you will if you come up with your own thing.  Think of it this way, when two crafters make the same stuff, they split the crowd that wants it.  When you have your own thing, you can actually have the SAME customers as everyone else.  Why sell MORE pie when you can sell chocolate cake?  Some of us want pie AND cake.

Sunday, February 8, 2015

Copycat Blues

You cruise your Facebook feed and stop short.  THAT is identical to YOUR best seller.  Or you JUST released a pattern for monkey toe ear warmers and BAM, there are two more.  Including a free one.  Or you just released a new color palette and hers is SUPER CLOSE.
What do you do when you feel like someone copied you?  I'd like to walk you through it.

STEP 1:  Get away, far away, from your business social media platforms.
Why?
Nothing makes a customer want to click "unfollow" faster than negativity.  They want sunshine and rainbows and beautiful work.  That's what they followed you for in the first place.  A passive-aggressive vaguebook post is unpleasant.  Blatant calling out is worse.  If you still need to vent, see step 2.

STEP 2:  Find a safe place to vent briefly.
Vent where your customers are NOT.  Some ideas include a private Facebook group of professional contacts/suppliers, a private post to a trusted list on Facebook, or a PM/email to someone you really trust.

STEP 3:  Getting over it.
You can't stay angry.  You can't produce new, beautiful things when you're only thinking about so-and-so the copycat.  So here are some of my personal self-coaching bullet points when I feel copied.
  • Imitation is the highest form of flattery.  You're doing really well if someone else just wants to BE you.  
  • How original was the idea REALLY?  A pink hat with a white flower . . . Maybe I wasn't the first and definitely not the last.
  • Great minds think alike.  It is possible that they saw the same thing that inspired you.  Especially if you're a bit naughty and being VERY inspired by licensed characters. 
  • Your loyal customers are not interested in other people's copies of your work.  
  • You provide your customers with something special that they do not.  Are you using better materials?  Is your item photographed better?  Do you push yourself to provide superb quality?  Do people do a happy dance when they open your package and find it beautifully wrapped, or showered with fun little surprises?  
STEP 4:  Stay the course.
If the person is copying your best seller or something you're very well known for, don't give it away!  You keep doing you.  And you do it your very best.

STEP 5:  Innovate
Its hard to keep copying someone who keeps coming up with great stuff.  People WILL notice.  So keep coming up with things that are unique to your brand.

Note:  True copycats will usually undercut you on pricing as well.  Don't panic!  You know your price is fair.  They will raise their price or quit. Nobody likes working for free.  See steps 4 and 5.  

Friday, January 23, 2015

Setting Up Shop

Etsy shop, that is.
Or artfire (does that still exist?), or Zibbet, or a website, or a booth at a Farmers Market.
Let's talk shop! 

WHAT'S IN A NAME
Many don't know that before I was The Fine Lime, I had a crochet shop.  I named it Mo & Ozzy Creative Crochet Hats.  My seldom-used nickname is Mo, Mr. Lime's is Ozzy.  Oh, I thought I was so cute!  And I wanted to include crochet and hats in my name, you know, for Google and stuff.
Maybe not.
You see, it wasn't long before I was making a lot of things OTHER than hats.  And I was learning to knit.  So now what?  And no one could remember Mo & Ozzy.  And my hat was way too cute to be Ozzy-ie.
So choose your name carefully!  Consider the following.
1. Is it easy to remember?  If you want return customers, they have to know your name.
2. Is it too common?  Google it.  I thought about naming my yarn shop a bee-related name.  Nope.  I googled it.  There are a LOT of little spinning bees out there, I guess!  I have a fiber shop I like to shop from and I know it has something about kitty in the name.  It takes me forever to find that shop to make a purchase, so sometimes they miss out on my business.  Choose a name that's unique.
3.  Is it flexible?  Lets be honest, a lot of us creative folks like to hop from thing to thing.  Make sure your brand can take the creative flex!  Don't start from scratch every time you try a new thing.

Tuesday, October 14, 2014

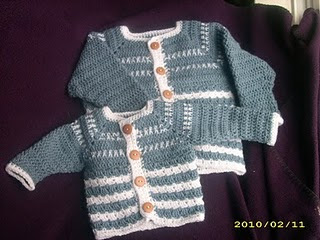
Striped Baby and Toddler Cardigan Pattern

I just wanted to share the pattern I re-did for my boy's sweaters! Hope you have fun trying it out! If you find mistakes, don't hesitate to let me know. Thanks!


Striped Crochet Baby or Toddler Cardigan
This is a raglan sweater that you work from the top down.

Materials: 2 (3) balls (180 yds ea) of A, 1 ball of yarn B (I used a baby yarn - labeled 3 - DK weight. I think you could use something heavier or lighter. I'd just go down or up a hook size.)
Hook: F
Sizes: 3-9 months, 9-18 mo (in parentheses), 18- 24 months (in parentheses)
Dc decrease: YO, pullup a loop, draw through 2 loops, YO, draw up a loop in the next st, YO, draw through 2 loops, YO, draw through all three loops.
Gauge: 4 dc = 1”

Yoke:
1. With A, ch 45 (45, 51), turn.
Dc in 3rd ch from hook and next 4 (4, 5) ch, [2 dc, ch 2, 2 dc] in next chain [corner made], dc in next 7 (7, 8) ch, corner in next ch, dc in next 13 (13, 15) ch, corner in next ch, dc in next 7 (7, 8) ch, corner in next ch, dc in next 6 (6, 7) ch.
2. Ch 2 [always counts as dc], turn. *Dc in next dc and all dc’s to corner chs. 2 dc, ch 2, 2 dc in corner space.* Repeat between * 3 times more, dc in each dc to end of row. Draw B through last 2 loops of the last dc. Stop here for 3-9 month size.
For 9-18 mo size, repeat 2 once morebefore changing color. For 24 month size - Repeat step 2 twice more before changing color.
3. With B, ch 1, turn. Sc in first dc, ch 1, *[skip 1 dc, sc in next dc, ch 1] to corner space, ch 3, sc in next dc, ch 1.* Repeat between * 3 times more. [Skip next dc, sc in next dc, ch 1] to last dc. Sc in last dc. Fasten off B, do not turn.
4. Return to beginning of row just completed. Join A with sl st to first sc. Ch 1, sc in first sc. *[sc in ch 1 space, ch 1] to corner, [2 sc, ch 1, 2 sc] in 3 ch corner space, ch 1.* Repeat between * 3 times more. [sc in ch 1 space, ch 1] to end of row. Fasten off A, do not turn.
5. Return to beginning of row just completed. Join B with sl st to first sc. Ch 1, sc in first sc. *[ch 1, sc in ch 1 space] to corner, sc in first sc of corner, ch 3, sc in last sc of corner.* Repeat between * 3 times more. [ch 1, sc in ch 1 space] to end of row. Fasten off B, do not turn.
6. Return to beginning of row just completed. Join A with sl st to first sc, ch 2 [counts as dc]. *Dc in each ch 1 space and sc to corner 3 ch space. [2 dc, ch 2, 2 dc] in corner space.* Repeat between * 3 times more. Dc in each ch 1 space and sc to end of row.
7. Ch 2, turn. Dc in each dc, [2 dc, ch 2, 2 dc] in each 2 ch corner space to end of row.
Repeat rows 3 through 6.

Sleeves: (Do both alike.)
Fold yoke in half the long way (ends to long back) with right sides facing. Corner spaces should match – these are the armpits! Join A with slip st through both corner ch 2 spaces.
1. Ch 2, dc in corner space. Dc in each dc around sleeve to where you started. 2 dc in the corner space. Join with a sl stitch to 2nd ch.
2. Ch 2, turn. Dc in next dc, dc decrease across next next 2 dc, dc in each dc to last 4 dc, dc decrease across next 2 dc, dc in each of last 2 dc. Join with sl stitch to first dc.
Repeat row 2 6 (8, 10) times. Ch 2, turn. Dc in ea dc around. Repeat until the sleeve measures 7” (8.5", 10"). Fasten off.
Body:
With right side facing you and the cardigan upside down, join A to the top of first dc on the left front.
1. Ch 2, dc in each dc to corner at underarm. 2 dc in corner space, skip sleeve stitches, 2 dc in next corner space, dc in each dc to corner at underarm. 2 dc in corner space, skip sleeve stitches, 2 dc in next corner space, dc in each dc to end of row.
For 9 month size, ch 2, turn, and dc in each dc around. For 24 month size, ch 2, turn and dc in ea dc twice around.
2. Ch 1, turn. Sc in first dc, *ch 2, skip 2 dc, sc in next dc* to end of row.
3. Ch 2, turn. Dc in first sc. 3 dc in each ch 2 space across row. Dc in last sc, drawing other yarn color through last 2 loops.
Repeat rows 2 and 3, alternating A and B until the piece measures 7” (10”) from underarm.
Front Borders:
*NOTE: There will button holes on both the right and left side of the piece. This allows for either boy or girl placement and makes it really easy to tell where to place the buttons!
With right side facing, join B with sl stitch to top right of neck. Ch 1, sc in same place and down front edge, working 1 sc under bar of each dc and end of each sc row. Ch 1, turn. Sc in each sc to end of row. Ch 1, turn. Sc in first 2 sc, *ch 2, skip next 2 sc, sc in next 6 sc*. Repeat between * 3 (4) times. Sc to end of row. Ch 1, turn. Sc in each sc, 2 sc in each ch 2 space to end of row. Ch 1, turn. Sc in each sc to end of row. Fasten off.
Do the left side the same way, but don’t fasten off!

Neck Border:
Ch 1, turn and sc in each stitch across the front border, around the neck, and across the other front border. Ch 1, turn, and sc in each sc around. Fasten off.
Sleeve Borders:
Join B with a sl stitch to the top of last dc on the sleeve. Looking at the inside of the sleeve, sc in each dc around. Join to first sc with a sl stitch. Ch 1, turn. Sc in each sc around. Join to first sc with sl stitch. Fasten off. Repeat on other sleeve.
Buttons:
I used 1” buttons on my sweaters and found they were a good size.

Thursday, May 22, 2014

What the WPI?

My yarn listings include WPI . . . and a lot of people aren't familiar with that!  What Part Ice?  When Purling Information? 

WPI means WRAPS PER INCH.  What it boils down to is how many times it takes the yarn to make one inch.  So if I have a yarn labled 8 WPI, it means it takes 8 strands of that yarn to make an inch - that yarn averages about 1/8 of an inch wide. 

Why do I include that information?  Well, I noticed on Ravelry that a lot of pattern writers include the WPI desired for gauge.  If you know the WPI of the yarn suggested, you can swap in another yarn of similar thickness without having to change your hook/needle size or number of stitches. 

How do you figure out WPI?  Well, the best way is actually NOT to wrap the yarn around a ruler.  Because 1. That is tricky and 2. You'll have a tendency to pull the yarn tight, making it look skinnier than it is.  So the best way is to put your yarn gently on the ruler to count.  You will want to cover 2 - 3 inches with handspun so you can get a good average. 

WPI - Knowledge is yarn swapping power!  

This is the WPI tool I use.  You do NOT need a special tool.  Its just less cumbersome and easier to hide from my children! 

You can just use any ruler (as pictured below.) 

Friday, April 26, 2013

I Wanna Touch It!

Oh, how I wish you could!  I really, really, wish you could just reach through your screen and pet the yarns in my shop (with clean hands, of course!) 

A question I'm frequently asked is, "how soft is this yarn?  Is it softer than cheap acrylic yarn?  Is it as soft as my favorite craft store yarn?" 

Well, I do try to give you that info in the listings . . . but knowledge is power!  So, I'm going to fill you in on the details about micron count, how I decide if a fiber is next to skin soft, and a quick overview of fibers I use in order of softness. 

MICRON COUNT
No, not the techie kind . . . the fiber kind!  Micron refers to a measurement - a teeny tiny measurement! - of the diameter of just one fiber.  Finer fiber - or fiber with a smaller diameter - is generally going to be softer than a fiber with a higher micron number.  So if soft is your thing, you're looking for a low number, not a high one.  (Think baby fine hair as opposed to my wiry, coarse hair!)  

HOW SOFT IS IT?  
In my listings you will see the following descriptors -
  • Not next to skin soft - this fiber is itchy.  It just is.  Its still fun yarn, but don't make a cowl out of it.  It might be best to use as trim or for an item you don't wear on your skin. 
  • Next to skin soft for some - this fiber is just a little itchy if I lay it on my arm.  It might not bother you one bit, but its just a little coarse for this sensitive skinned lime! 
  • Next to skin soft for most - this fiber is a little itchy for my neck, but soft and lovely on my arm.  If I were making something with it, I might not choose a scarf or cowl, but just about anything else would be lovely. 
  • Next to skin soft - this fiber feels luxurious and soft, even on my neck.  I might also call this yummy. 
  • More than next to skin soft - I would bathe in this.  Seriously soft. 
You will probably notice that I like to work with fibers that are next to skin soft for most or softer. 


FIBER GUIDE
*remember, each sheep or other cute critter will have its own style!  This is just a general guide based on the samples I've gotten my greedy fiber mitts on.* 
  • Corriedale/Domestic Wool/Superwash Wool/Jacobs/Shetland/Romney/Other Farm Wools - these are often nameless breeds, a mix of wools, or ones you won't have heard of.  Springy and durable, they'd make great socks or other items that see a lot of wear and tear.  These are usually in the 24 to 28 micron range. 
  • Punta Wool - This is usually pretty soft!  Its a blend of wool breeds from South America, and the batch I get does make a difference, but we're usually looking at next to skin soft for most or next to skin soft.  This is my favorite economical option for people who are on a tight budget wanting to use handspun yarn.  Usually Punta is 22 to 24 micron. 
  • Superwash BFL Wool - sometimes the chemical processed used to make fiber machine washable also makes it a little less soft.  See the next entry for more info about BFL Wool. 
  • BFL Wool - Blue Faced Leicester wool is curlier than merino.  It is just slightly less soft.  It often has a subtle sheen. 
  • Polwarth Wool - A merino bred with a little bit of Lincoln, this fiber is longer and curlier than merino too and just slightly less soft.  The polwarth I purchase is usually 21 to 23 micron. 
  • Ramboulliet Wool - Another breed with just a little longer fiber than merino, but just as soft.  I've usually gotten Ramboulliet that is 21 micron. 
  • Superwash Merino Wool - I usually buy superwash lambswool merino, but sometimes not.  This will usually be just slightly less soft than merino, but if its lambswool, sometimes its just as soft! 
  • Merino Wool - This is one of the softest wools I get my hands on.  Most merino spinners use is between 18 and 22 micron. 
Other fine wools I get to work with from time to time include Finn, Cormo, Targhee, and Columbia.  These will often be as soft as BFL all the way to softer than merino. 

Other luxe, insane soft fibers you may see include yak, cashmere,

camel, angora bunny, cria (baby) alpaca, silk, bamboo, milk protein fiber, and tencel.  
 
I use alpaca sometimes.  Alpaca can vary in softness.  I try to get my hands on the soft stuff, though!  (18 to 23 micron.) 

Sometimes I use nylon.  It can be crazy soft - like faux cashmere - or a workhorse nylon for sock blends

A word on sparkle - I personally find firestar less poky than angelina . . . neither are "ohmygoodnesscrazysoft" but sometimes you just need some sparkle! 

Wednesday, March 27, 2013

Skeins, Hanks, and Balls

One question I'm often asked is, "Why don't you send out my yarn in center pull balls?"  Well.  Lets talk about it! 

When a yarn is pulled off the bobbin of my spinning wheel, I wrap it on something called a Niddy Noddy.  It looks like the letter I, but with the bottom line twisted 90 degrees.  I use that thing to count the yards as I wind off your yarn.  Then, I wash the yarn (still in a big loop) and hang it up to dry.  When its dry, that big loop of strands is called a HANK.  When I twist the hank on itself after photographing, its now called a SKEIN.  I pretty that up and send it to you!  

 SKEIN

 HANK

I do not put the yarn into center pull balls because its not very good for your yarn!  If you're going to use yarn right away, a center pull ball is a fine choice - keeps everything nice and tidyIf you're going to think about it for a little while, store it in your stash, a center pull ball is not the right choice for Fine Lime handspun.  It can cause some problems!  
  • A ball is much tighter and compact than a skein.  For nice, loffty, squishy handspun, it will flatten your yarn out by smooshing the fibers.  This would be an especially sad fate for thick and thin yarn! 
  • A ball doesn't allow for air flow through the fiber, so if the humidity changes, moisture can be trapped inside, causing yucky things like decomposition and mold.  
You can easily create a center pull ball at home.  The fastest/easiest way is to buy an inxepensive swift (looks like an umbrella!  It holds your hank in a big loop and spins as you wind) and ball winder.  For shorter projects, I know several knitters and hookers who choose just to work from the yarn on the swift. A less expensive way is to use a nostepine (tapered stick, basically!  You can even use a large knitting needle) and wind by hand. 

Saturday, February 18, 2012

Marketing Your Handspun Items

I started out in the Etsy fiber arts world as a hooker. As most of us do, I started out with commercial millspun acrylics and cottons. Economical, lots of colors, easy to find and reproduce . . . but boy did I love to buy the soft and wacky. I soon found that I hated making the same item from the same yarn over and over. I was frustrated that my customers wanted super cheap, but super cute hats from super cheap yarn.I found it difficult to justify buying and using the yarns I REALLY wanted.

The number one thing I hear from potential customers in my yarn shop is, "I really love your yarn, but I can't sell anything made from handspun."


Are you sure?


Here are some fantastic tips for marketing your items made from handspun yarn so you can get to working with the yarns you REALLY want to work with and stop cranking out mind numbing creations.
Get your creativity back!

1. Help your customers see what YOU see.
*Make something for yourself or a loved one from handspun and share pics of the item being enjoyed
*Post photos of your beautiful yarns, telling fans what you can make with them.  I know from experience that customers enjoy choosing the materials you use to create their custom item. 

*Share your favorite yarn shop fanpages on your fanpage - let your customers get to know the spinners
*Briefly describe the process the yarn already went through before you transformed it into a finished item - let customers see how much time and care has gone into this item!
*Let the yarn shop do the work - if you bought your yarn on Etsy, link to the listing you purchased in the listing for your finished item.
*Many spinners love to see what you've created from our yarns - share your listing with us and we might just share it with our fans!

2. Highlight the virtues of handspun yarn.
*Handspun yarn is frequently made from natural fibers - which biodegrade, unlike acrylics, which will sit in a landfill forever when they go out of fashion
*Choosing handspun is choosing handmade and supporting a spinner. You are sometimes indirectly supporting the dyer and a farmer too! For example, I'm working on a yarn right now that includes a batt from a fellow fiber artist on Etsy and locks from a young 4H farmer in TN. If you were to purchase that yarn, you'd not only support me, but Amber who carded the batt and Ashley who raised the sheep!
*Handspun yarn yields a OOAK (one of a kind) product. A friend of mine purchased the same lovely roving as I and look at the difference in the yarns! Each spinner puts her unique twist on yarn.


*Handspun from natural fibers will be warmer than an acrylic item.
*Its just plain soft and pretty, am I right? 


3. Dispel the myths!
 *MYTH 1: I won't be able to wash my item - Nope, you can wash it quite easily - a little detergent and cool water in the sink, mere seconds of actual washing, roll it in a towel, and then lay it flat on your dryer on wash day. Or, purchase superwash yarn. I usually have at least 3 or 4 skeins of superwash in my shop.
 *MYTH 2: Wool is itchy - Try merino, polwarth, ramboulliet . . . . many breeds are softer than commonly used craft store yarns. The coarsest yarn in my shop is softer than Red Heart.
 *MYTH 3: It is way too expensive for my customers - First, a chunky handspun will not require many yards or hours to complete your project. Additionally, you may attract new customers who are looking (and willing to pay) for handspun.


Are you ready to shop? Start with just a few items and see how it goes! Remember to educate your customer so they can make informed, happy shopping decisions.

Saturday, February 4, 2012

Welcome!

I'm not a very good blogger, but I'm gonna try! 
The Fine Lime is a mother daughter Etsy shop full of fun, fresh, handspun yarn!  We try to keep it colorful and exciting with lots of variety so that you can find that perfect yarn for your very special knitting, crochet, felting, or other creative project! 
Posts on this blog will include tutorials, reviews, tips, and more!