

I just wanted to share the pattern I re-did for my boy's sweaters! Hope you have fun trying it out! If you find mistakes, don't hesitate to let me know. Thanks!
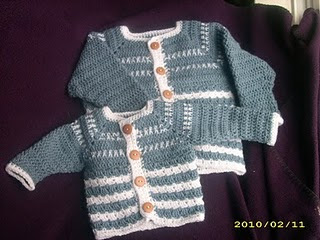


This is a raglan sweater that you work from the top down.
Materials: 2 (3) balls (180 yds ea) of A, 1 ball of yarn B (I used a baby yarn - labeled 3 - DK weight. I think you could use something heavier or lighter. I'd just go down or up a hook size.)
Hook: F
Sizes: 3-9 months, 9-18 mo (in parentheses), 18- 24 months (in parentheses)
Dc decrease: YO, pullup a loop, draw through 2 loops, YO, draw up a loop in the next st, YO, draw through 2 loops, YO, draw through all three loops.
Gauge: 4 dc = 1”
Yoke:
1. With A, ch 45 (45, 51), turn.
Dc in 3rd ch from hook and next 4 (4, 5) ch, [2 dc, ch 2, 2 dc] in next chain [corner made], dc in next 7 (7, 8) ch, corner in next ch, dc in next 13 (13, 15) ch, corner in next ch, dc in next 7 (7, 8) ch, corner in next ch, dc in next 6 (6, 7) ch.
2. Ch 2 [always counts as dc], turn. *Dc in next dc and all dc’s to corner chs. 2 dc, ch 2, 2 dc in corner space.* Repeat between * 3 times more, dc in each dc to end of row. Draw B through last 2 loops of the last dc. Stop here for 3-9 month size.
For 9-18 mo size, repeat 2 once morebefore changing color. For 24 month size - Repeat step 2 twice more before changing color.
3. With B, ch 1, turn. Sc in first dc, ch 1, *[skip 1 dc, sc in next dc, ch 1] to corner space, ch 3, sc in next dc, ch 1.* Repeat between * 3 times more. [Skip next dc, sc in next dc, ch 1] to last dc. Sc in last dc. Fasten off B, do not turn.
4. Return to beginning of row just completed. Join A with sl st to first sc. Ch 1, sc in first sc. *[sc in ch 1 space, ch 1] to corner, [2 sc, ch 1, 2 sc] in 3 ch corner space, ch 1.* Repeat between * 3 times more. [sc in ch 1 space, ch 1] to end of row. Fasten off A, do not turn.
5. Return to beginning of row just completed. Join B with sl st to first sc. Ch 1, sc in first sc. *[ch 1, sc in ch 1 space] to corner, sc in first sc of corner, ch 3, sc in last sc of corner.* Repeat between * 3 times more. [ch 1, sc in ch 1 space] to end of row. Fasten off B, do not turn.
6. Return to beginning of row just completed. Join A with sl st to first sc, ch 2 [counts as dc]. *Dc in each ch 1 space and sc to corner 3 ch space. [2 dc, ch 2, 2 dc] in corner space.* Repeat between * 3 times more. Dc in each ch 1 space and sc to end of row.
7. Ch 2, turn. Dc in each dc, [2 dc, ch 2, 2 dc] in each 2 ch corner space to end of row.
Repeat rows 3 through 6.
Sleeves: (Do both alike.)
Fold yoke in half the long way (ends to long back) with right sides facing. Corner spaces should match – these are the armpits! Join A with slip st through both corner ch 2 spaces.
1. Ch 2, dc in corner space. Dc in each dc around sleeve to where you started. 2 dc in the corner space. Join with a sl stitch to 2nd ch.
2. Ch 2, turn. Dc in next dc, dc decrease across next next 2 dc, dc in each dc to last 4 dc, dc decrease across next 2 dc, dc in each of last 2 dc. Join with sl stitch to first dc.
Repeat row 2 6 (8, 10) times. Ch 2, turn. Dc in ea dc around. Repeat until the sleeve measures 7” (8.5", 10"). Fasten off.
Body:
With right side facing you and the cardigan upside down, join A to the top of first dc on the left front.
1. Ch 2, dc in each dc to corner at underarm. 2 dc in corner space, skip sleeve stitches, 2 dc in next corner space, dc in each dc to corner at underarm. 2 dc in corner space, skip sleeve stitches, 2 dc in next corner space, dc in each dc to end of row.
For 9 month size, ch 2, turn, and dc in each dc around. For 24 month size, ch 2, turn and dc in ea dc twice around.
2. Ch 1, turn. Sc in first dc, *ch 2, skip 2 dc, sc in next dc* to end of row.
3. Ch 2, turn. Dc in first sc. 3 dc in each ch 2 space across row. Dc in last sc, drawing other yarn color through last 2 loops.
Repeat rows 2 and 3, alternating A and B until the piece measures 7” (10”) from underarm.
Front Borders:
*NOTE: There will button holes on both the right and left side of the piece. This allows for either boy or girl placement and makes it really easy to tell where to place the buttons!
With right side facing, join B with sl stitch to top right of neck. Ch 1, sc in same place and down front edge, working 1 sc under bar of each dc and end of each sc row. Ch 1, turn. Sc in each sc to end of row. Ch 1, turn. Sc in first 2 sc, *ch 2, skip next 2 sc, sc in next 6 sc*. Repeat between * 3 (4) times. Sc to end of row. Ch 1, turn. Sc in each sc, 2 sc in each ch 2 space to end of row. Ch 1, turn. Sc in each sc to end of row. Fasten off.
Do the left side the same way, but don’t fasten off!
Neck Border:
Ch 1, turn and sc in each stitch across the front border, around the neck, and across the other front border. Ch 1, turn, and sc in each sc around. Fasten off.
Sleeve Borders:
Join B with a sl stitch to the top of last dc on the sleeve. Looking at the inside of the sleeve, sc in each dc around. Join to first sc with a sl stitch. Ch 1, turn. Sc in each sc around. Join to first sc with sl stitch. Fasten off. Repeat on other sleeve.
Buttons:
I used 1” buttons on my sweaters and found they were a good size.
I used 1” buttons on my sweaters and found they were a good size.


